Pro Form
Action
Add your preferred STRIPE payment Action
HINT: set payment as first action to execute next actions only after payment execution
Donate
Cart
Subscription
Custom
Stripe Action
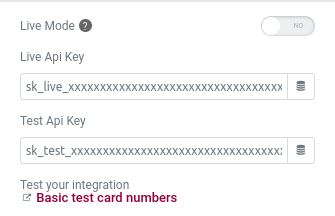
Live Mode
Enable it to go live and accept real payment
Live Api Key
It begin with “sk_live_” and it’s needed to use this action
Test Api Key
It begin with “sk_test_” and it’s optional, but needed to test this action in non live mode using fake Credits Cards provided by Stripe
Base Settings
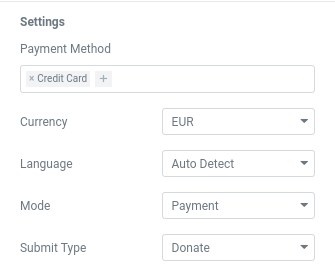
Payment Method
This gateway support more methods as alternative than Credit Card, like SEPA, AliPay, etc
Currency
Select the preferred currency accepted
Language
You can force a language used in checkout page, or it will be detected automatically
Mode
- Payment, accept one-time payments for cards, iDEAL, and more.
- Subscription, create a recurring payment, use Stripe Billing to set up fixed-price subscriptions
- Setup, save payment details to charge your customers later.
Submit Type
Describes the type of transaction being performed by Checkout in order to customize relevant text on the page, such as the submit button.
- Auto, it will be auto selected
- Pay, determine a standard payment
- Book, to Booking
- Donate, the transition is for a Donation

Payment Type
Payment Link
You can configure all information and settings about the checkout page directly from Stripe dashboard, the form so simply redirect user to your custom link
Checkout Payment
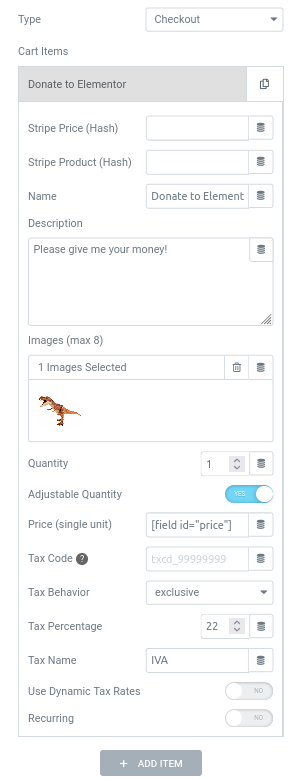
You can define multiple Products into the cart to show in Stripe Checkout page
Stripe Price/Product
You can configure Price and Product information directly from Stripe dashboard, so no need to insert here those info
PRODUCT DATA
Name/Description/Images
You can configure Product optional information that will appear in checkout
Quantity
Set the wanted quantity of this product and optionally let user to Adjust it on checkout
Price
The single price of current Product, you can insert a numeric value (like “12.99”) or Field Shortcode
Tax Code
Optionally indicate what’s the tax apply to this kind of good (only for US)
Tax Behavior
Define if tax is included or excluded into Price set previously and set its Percentage and Name
Use Dynamic Tax Rates
Optional, calculate and collect sales tax, VAT, and GST with one line of code or the click of a button.
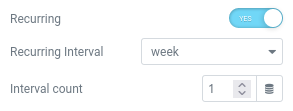
Subscriptions
When activate Recurring option for a Product you can set the Interval between each transitions
Interval
This is the size of time intend as:
day, week, month, year
Interval Count
How many intervals should pass before next automatic transition
Checkout Settings
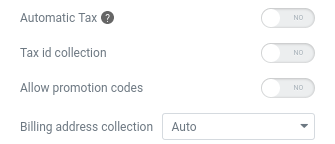
Automatic Tax
Stripe Tax lets you calculate and collect sales tax, VAT, and GST with one line of code or the click of a button. Know where to register, automatically collect the right amount of tax, and access the reports you need to file returns.
This is an extra paid service and need to be activated on your account
Tax ID Collection
Displaying a customer’s tax ID and legal business name on invoices is a common requirement that you can satisfy by enabling tax ID collection in Checkout
Allow Promotion Codes
Enable the possibility to let user use in Checkout any Coupon configured on your Stripe account
Billing Address Collection
Enable if you need information about user address (maybe for shipping) to be collected on Checkout page before payment
Common Settings
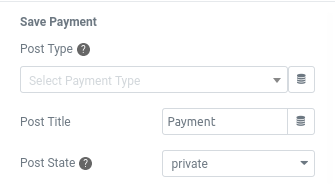
Save Payment
Store all Payments data into DB
Post Type
Each form submission generate a new post of your preferred Post Type to store all payments data.
By default type is “Payments” (e_payment).
You can generated a dedicated CPT with PODS (or similar) to consult and manage payments from Admin area
Post Title
A name for the Payment Post
Post State
Initially the post has Draft state which will be changed on selected one when complete
User registration
Generate User from Payment info
If the visitor who made this payment was not logged in and registered, you can automatically generate a new user from the email collected by the gateway during the payment process, this allows you to associate the user with the payment
Extra Settings
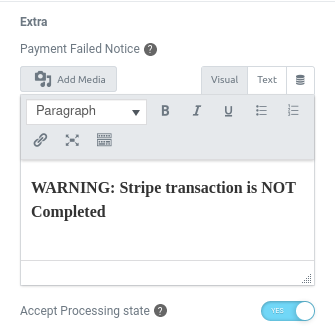
Payment Failed Notice
If user Cancel payment or there will be an error and the payment is not Complete, so a warning notice will be show before the Form.
Accept Processing state
Sometime happens that return payment is in Processing state, not fully completed, but soon it will be, so maybe you could want to accept them.
OPTIONAL: A configured WEBHOOK will update the payment state and process the form actions.
The correct URL to configure in webhook is:
https://your-site.com/wp-content/plugins/e-addons-pro-payments/modules/payments/front/webhook.php
for the following Event Types:
- payment_intent.succeeded
- checkout.session.completed
- checkout.session.async_payment_succeeded
Logs Webhook
Enable Log
Get a complete Report on each payment and event information provided by your configured WebHooks
Log Path
Set the directory starting from the Uploads folder

DEMO
Donation
Offer me a Beer
Subscribe now
Recurring payments, like in a Membership


 e-Pro Payments


